Thank you for downloading model.
Here’s how to import my model into FaceRig.
Free sample data: https://concretebox.booth.pm/items/2137212
Free sample data is available here. The basic import method is the same for all models, so if you are considering purchasing, please use it.
————————————————————
First, unzip the downloaded zip file and put it where you want to put it.

Open Steam and find FaceRig in your library. Right-click on it and choose Manage > Browse Local Files.

The FaceRig folder will open.
Open Bin>Tools>ImportWizardNew>ImportWizard.exe
Select “Yes” when the Windows warning appears.

When this window appears, select ModelImporter.

Look at the top left.
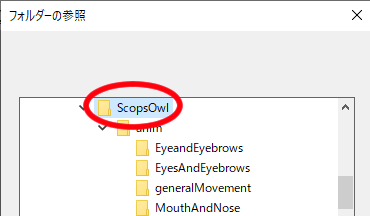
Click Browse in the Data Folder column and select the file you just unzipped.

Select the data file and press OK.
It loads and press Import in the bottom right corner.
(I’m trying to make it load automatically, but it doesn’t work in some environments.If that’s the case, check out this page.And please specify the data manually.)https://concreteboxstudio.com/2020/09/11/the-moving-parts-dont-work-textures-do-not-appear/

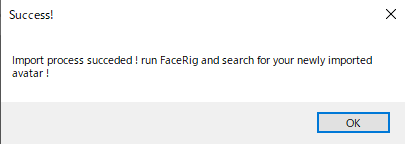
When Success! is displayed, click OK to close all windows.
Open FaceRig, and in the avatar selection screen, click on the ? icon to use this model.
? icon will be automatically replaced by a screenshot of this data if you use this avatar for a bit.
Please find and use your own settings, such as advanced tracking settings.
Alt+Left click on the Facerig to rotate up, down, left or right
Alt+mouse wheel allows you to zoom in and out. Please use it when setting up.